 |

1. Take your conceptual design through to a high degree of resolution.
2. Develop the design of the stair in terms of composition, materials, balustrades and structure. Pay special attention to how the stair integrates with the surrounding architecture (i.e. you'll need to draw sections showing both the stair and the building fabric it touches).
3. Reflecting on the SketchUp model and sketches in your notebook consider 3 points of view that would show the most significant and distinctive aspects of your design when cut by an animated section; discuss these with your tutor.
See the video tutorials below on animating sections for further explanation:
NOTE: make sure you hide the section planes during your animation ... otherwise your model will appear all washed out and dull (this is not good).
4. To download and install your educational version of the Lumion rendering software for next weeks online tutorial follow these steps:
Step 1: Go to one of the BE computer labs and navigate to the ARCH1101 Resources folder on the course folders drive, which is here: S:\Courses\ARCH1101-ArchDes1\Resources
Step 2: In there you'll see a folder called Lumion 8. Copy that whole folder to your hard drive or memory stick. Copy that to your own machine and double click the exe component to start the installation. It took a while to copy onto my machine and a few minutes to install so you'll need to be patient.
Important Note: Make sure you don't shut your machine down without quitting Lumion so it can release the license for other students to use!
Important Note 2: We will be having our FIRST MEETING WITH STUDENT REPS TODAY AT 4PM the forum space on level 5, please let them know about any concerns or suggestions you might have before then.

Complete by the beginning of next weeks tutorial.
1. Continue to develop your Sketchup model through to a high level of resolution. This model should include the best examples of your custom textures (remember, not all of the models geometry needs to be textured) and the scenes used to construct your animations.
2. Upload 3 images of your developed Sketchup model and the set of 2 dimensional section drawings from your notebooks to your blog. Include each materials name as a caption.
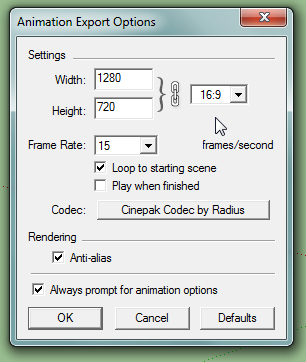
3. Create 3 short (15 second max) animations based on the points of view and sections discussed above. Use the export settings shown below.
Note: With video animation there are a great deal of options in terms of how a video is saved. In sketchup you can specify the frame size, the frame rate, the file type, the codec (compression and decompression type) and aspect ratio to name a few. For your animations in exp1 use the settings below.

3. Upload your final Sketchup model to the 3dWarehouse. Include "ARCH1101", "EXP1", "2019" and your "Full Name" as tags to your Google Warehouse uploads. See below for a tutorial on how to do this; the appropriate section is labeled "Uploading Models". http://help.sketchup.com/en/article/3000256
4. Upload the 3 short (15 second max) animations to YouTube and embed them in your blog. Include "ARCH1101", "EXP1", "2019" and your "Full Name" as tags to your YouTube uploads.