
|

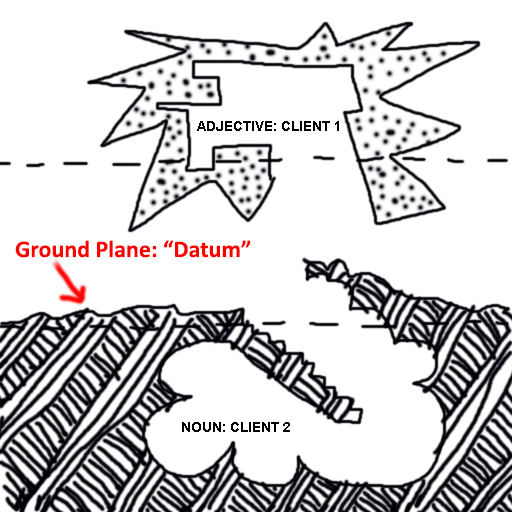
1. Divide the first few pages of your notebook into three horizontal bands; do this by drawing two dashed horizontal lines (note: they don't need to be evenly spaced). The second dashed line as you count down from the top is the ground plane; thats your datum. See the drawing below for reference.
2. Draw a series of 9 sections exploring the relationship between two of the projects you chose and the ground line as a datum. Use a range of carefully hatched lines to signify where the section cuts through solid material and to indicate what that material might be. Ensure that the material surrounding the Architecture below ground level is shown as solid.
Keep in mind that the horizontal dashed lines are there as guidelines, feel free to cross those boundaries.
See a table showing the combinations of words inspiring your sections and an example sketch below:
| Above | Adjective Client 1 | Adjective Client 1 | Adjective Client 1 |
| Below | Adjective Client 2 | Verb Client 2 | Noun Client 2 |
| Above | Verb Client 1 | Verb Client 1 | Verb Client 1 |
| Below | Adjective Client 2 | Verb Client 2 | Noun Client 2 |
| Above | Noun Client 1 | Noun Client 1 | Noun Client 1 |
| Below | Adjective Client 2 | Verb Client 2 | Noun Client 2 |
3. Draw another series of 9 sections reversing above and below.

Complete by the beginning of next weeks tutorial.
1. In consultation with your tutor take one of the sections created in class and develop it in 3 dimensions using SketchUp.
Note: Trimble, the owners of SketchUp, are pushing the browser based version of SketchUp and not supporting SketchUp Make any more ... however it is still available; you can download it here: https://www.sketchup.com/download/all SketchUp Make 2017.
Another option is to purchase the Pro version for educational use from the local Australian re-seller, its very reasonably priced at $88.00 (including GST) and has solid modeling options which can be very handy. You can get that here: https://www.sketchupaustralia.com.au/products/education/
In SketchUp begin by following the "Getting Started with SketchUp" video tutorials here: https://youtu.be/dL01iW9DAEU . Do parts 1-4. Have the "Instructor" open while you select tools to use WINDOW > INSTRUCTOR. We expect that the 3 dimensional model will be different than you first imagined in your sketch's, this is a normal part of the design development process so move ahead with confidence as your 3 dimensional model "evolves".
TIP: You will be most successful when learning computer software (or anything for that matter) if you work together in groups. Your collegues in ARCH1101 are one of your most valuable resourses.
2. Save two images from your SketchUp model and upload them, along with the page from your sketchbook that you based it on, to your blog. Include the two words that the architecture responds to as a caption to the images and confirm your material selection.
Note: make sure you save the SketchUp model in a safe place as it will be a part of your EXP1 submission.