 |

1. Choose an image from today's lecture and post it to your blog.
2. Experiment with the Skyboxes provided to help you recreate the mood and drama evident in your chosen, with your own Island:
In the Rollup Bar, click on the Environment tab:
Under Skybox > Sky, click on the ... button to bring up the Material Editor:
Navigate to Materials > Sky:
Select one of the 10 materials provided, ie Rain:
Right-click on your chosen material and select Duplicate
Right-click again on your duplicate material and select Rename
Navigate to where your duplicate material has been created: Game\materials\sky:
Select and rename your new material to something appropriate, NO GAPS OR SYMBOLS
In your new material's Diffuse tab, click on the ... button and choose a new texture, e.g. textures/skys/rain/box_34.dds:
Back in the Rollup Bar under Skybox > Sky, click on the < button in order to assign your new material to your level. NOTE: nothing yet will happen:
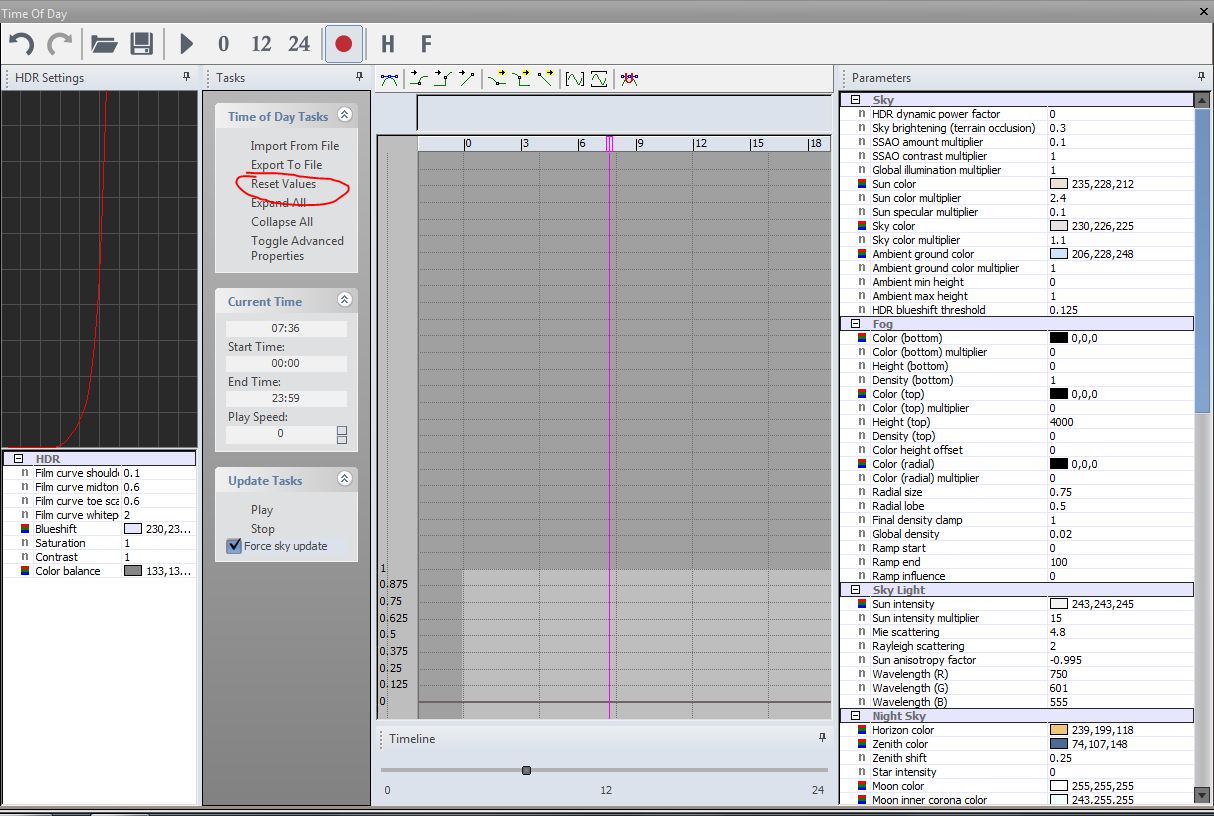
Go to Terrain > Time of Day and select Reset Values. Now you should see your new Skybox in your level:
Post Before and After images to your blog:
Before:
After:

3. Open up the Time Of Day window and take a screenshot of the current settings as illustrated above. Post to your blog. Now watch "Your First Level - Detailed Lighting" on CryEngine 3 : an introduction and application. Vol. 3 (remember, all these videos are also available on the FBE Courses network drive) and play around with the settings, such as HDR film curves, Color balance, HDR dynamic power factor, Sun color multiplier, Sun specular multiplier... Post the resulting image to your blog, along with a screenshot of your Time of Day settings:
4. Save your Time of Day Settings by clicking Export to File in the Time of Day editor, to Game\Levels
5. Repeat 1, 2, 3 and 4 two more times with different reference images and with different skyboxes and textures both times. Post all images to your blog. You can use the default sky as one of your experiments (materials/sky/sky). NOTE: the default sky is different to the other skys - it is an dynamic(High Dynamic Range Image (HDR), not a static Skybox, as specified in its Shader tab in the Material Editor. Check out the official Crysis Time of Day documentation here.
RELEVANT TUTORIALS TO THE SUBLIME: (remember, all these videos are also available on the FBE Courses network drive)
In order to create rain, wind, dust, lightning:
"Your First Level – Particles" on CryEngine 3 : an introduction and application. Vol. 2, and
"Particles Overview" on CryEngine 3 : an introduction and application. Vol. 3
In order to create fog:
"Your First Level - Environment Tab", and
Your First Level – Fog Volumes on CryEngine 3 : an introduction and application. Vol. 1
In order to create static and moving clouds:
Your First Level – Cloud on CryEngine 3 : an introduction and application. Vol. 2
In order to create waterfalls:
Your First Level – Water Volumes on CryEngine 3 : an introduction and application. Vol. 1

Complete by the beginning of next week's tutorial.
1. Continue working on your sublime scene. Include an example of each of the following in your island scene:
2. Using Fraps, create a 15 second video illustrating the above elements and the sublime nature of your custom island.
3. In approximately 50 words reflect on this weeks lecture and make a specific observation regarding its content as it relates to your own work.